


The power supply (PSU) is a crucial component in a PC, responsible for distributing electric power to all other components. PSU issues often lead to system failures, evident in symptoms like failure to power up, burning smells, or lack of current. Basic tests like multimeter or jumper tests can help users assess their PSU’s condition. Users need to be familiar with these tests and handle them with care.
- The Power Supply Unit or PSU of a system can crash or fail every once in a while.
- The causes of a power supply failure may be a sudden voltage spike, sudden irregularity in the input electrical energy, or sudden power outage, which causes the system to shut down abruptly.
- Basic tests such as the jumper wire, PSU, and multimeter tests can test the power supply for errors and faults.
Checking Your Power Supply With A Basic Jumper Wire Test
You can check your PC’s power supply to see whether it is functional using only a jumper wire. The jumper wire completes the electrical circuitry in the power supply by connecting the input and output pins. In this way, we can analyze whether or not the power supply is giving the required power as the output.
I tried this method first as it is the simplest method, and it told me the basic information I needed to know about my PSU unit. All you have to do is follow the steps mentioned below:
- Remove the cables: Shut your computer down > Unplug all the cables from the CPU > Open the PC side case panel > Remove all the cables from the power supply.
- Take a bent Jumper: Bend a jumper wire into a U shape. The ends of the jumper wire will act as the ends that will go into the slots of the power signal, giving it the power-on Signal.
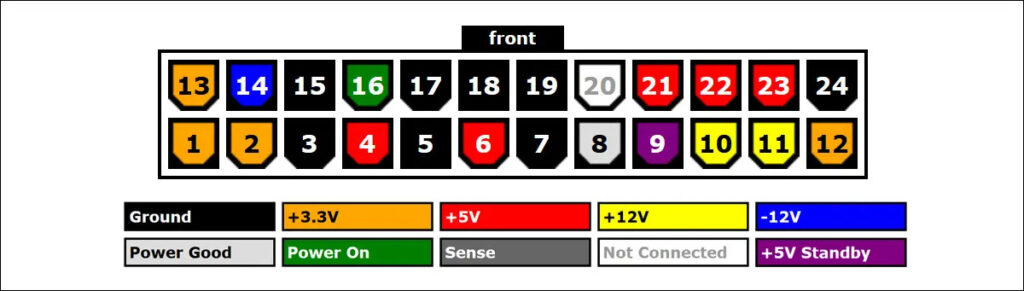
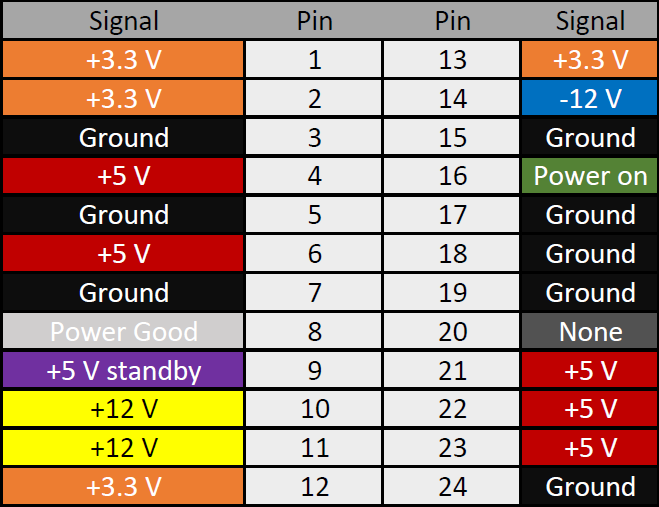
- Locate the PSU Connector: Locate the power supply connector connected to your motherboard > Find the green and black pins in the connector (make-specific) or pins 16 and 17 in a different make.

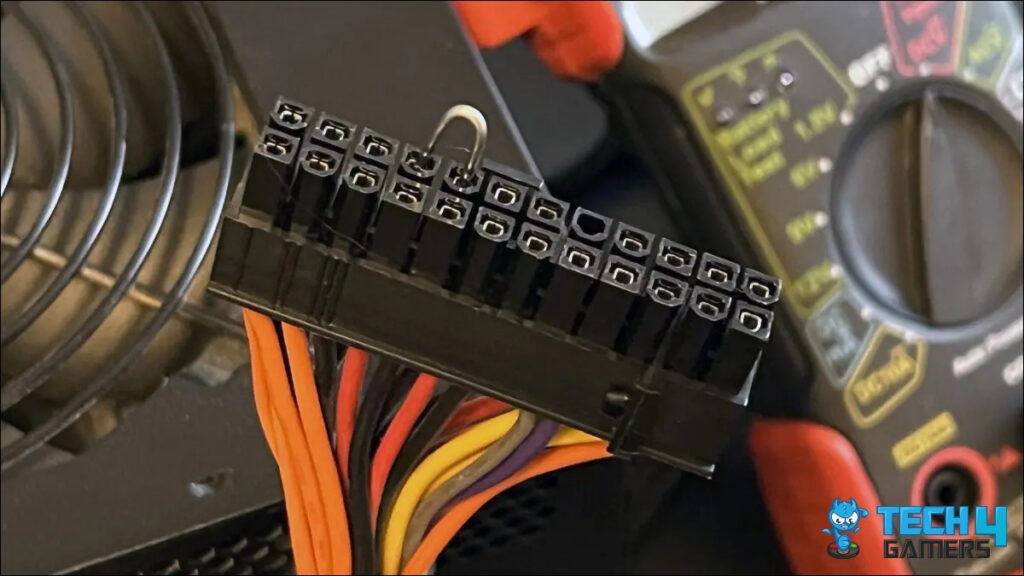
PSU Jumper Wires Configuration - Insert the Jumper in the pins: Once located, insert both ends of the jumper wire into the green pin and the neighboring black pin or pins 16 and pin 17 in a black PSU connector.

PSU Pins Configuration (Image Credits: Tech4Gamers) - Connect the PSU: Connect the PSU cable to a power outlet. The jumper wire will regulate the power flow in the power supply.
- Test Outcome: If the connections are okay and the power supply is not working (the fan is stationary). The power supply is dead.
You should also bear in mind that the fan of the power supply will not necessarily move all the time. Some power supplies inhibit the Zero RAM feature, which cuts power using an automatic fan. The fan only opens for a while, then stops. This is not a problem but a power-saving technique. Once the power supply switch is on, precisely monitor the fan’s movement.
This test is used only to check whether the power supply is dead. This test is the most basic out of all the methods described. But a demerit of this method is the danger to the person doing the test.
Checking Your Power Supply With A Multimeter
The Multimeter method is prevalent and affordable because it is a cheap and valuable product you can often borrow from anyone, as many people have a multimeter in their cars and battery kits. However, one must know how to use a multimeter, change the output modes and connections, and have basic knowledge about the multimeter to apply this method.
I tried this method on my PSU as well, and I got to know about my PSU’s status as well as how much current it drew. Follow these steps to check your PC with a multimeter:
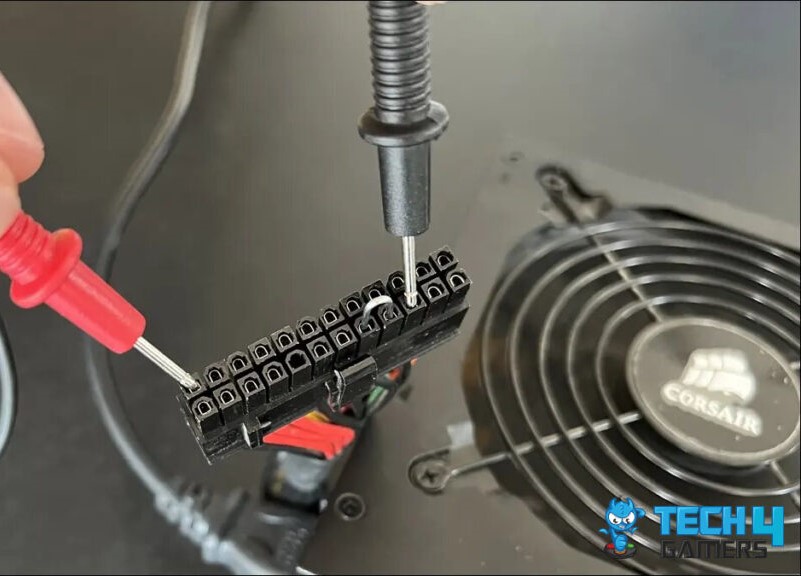
- Connect the Multimeter to PSU: Connect the multimeter to your power supply > Connect the negative probe to the grounded pin > Connect the positive probe to the power pin.

PSU Connection To Multimeter (Image Credits: Tech4Gamers) - Note the readings: Turn the power supply and the multimeter on > Note the readings from the power line.
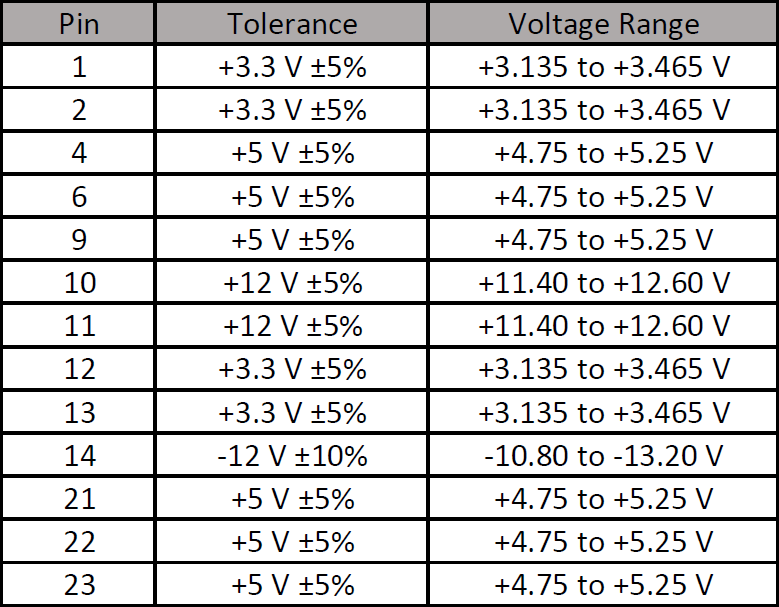
- Observe readings on each pin: Repeat this process for every power line in the power supply that carries a voltage (see the pin configuration in the power supply manufacturer details) > Observe the multimeter’s output on each pin.

PSU Tolerance (Image Credits: Corsair) - Test Outcome: If the power pins give the voltage readings out of the acceptable range, you must replace the power supply > You can safely perform the pressure test if the readings lie within the acceptable limit.

PSU Pinout (Image Credits: Corsair) - Reassemble the CPU: If all the voltage readings are acceptable > Reattach the power supply back to the computer > Reattach the case to the CPU.
Checking Your Power Supply With A PSU Tester
The simplest method to check your Power Supply Unit is using a PSU tester. The PSU tester is available in all online stores and services. The PSU tester method is simple and sometimes affordable, as the dedicated PSU testers are often relatively cheap. All you need to do is plug the PSU cables in their correct slots, and you will have a concise result of your power supply unit’s health. Check your PSU with the following steps:
- Disconnect the PSU: Disconnect the power supply from the CPU to the cables and connections.
- Connect the PSU Tester: Complete the connections of the PSU tester to the power supply and CPU > Switch your PC off.
- Disconnect the PSU: Open your computer > Disconnect your power supply completely from the CPU.
- Turn the PSU Tester On: Connect your power supply’s power connector (x24 pins, x4 pins) to the tester. You should turn off the PSU Tester at this point > Connect your power supply to a power outlet and turn the switch on > Turn your PSU Tester on. You will hear the sound of the PSU fan starting to run.
Checking Your PSU Using PSU Tester (Image Credits: Tech4Gamers) - Check the Voltage: Check the voltage and the PG value > The readings can deviate within the 5% acceptable range > The tester will alert you with an LED or sound if the values lie outside the permissible limit.

Sample PSU Tester Acceptable Ranges (Image Credits: Tech4Gamers) - Result Analysis: Any voltage outside the acceptable ranges means you must change your power supply > Subsequently, the PG reading must lie between 100-500 MS > If the PG value is very high, your computer will reboot or shut down frequently.
- Reconnect the PSU: After the test, disconnect the PSU tester from the power supply unit > Connect the power supply back to the CPU.


This method is straightforward and affordable, as the dedicated PSU testers are often relatively cheap. I tried this method, which yielded a definitive result, telling me all the information I needed about my power supply. All I needed to do was plug the PSU cables in their correct slots, and I got a concise result of my power supply unit’s health.
Last Words
The Power Supply Unit (PSU) is a vital component in a PC, it safeguards your PC components and is always under load, so it is reasonable that it might run into some issues at times.
I’m surprised at how common complaints of computer power supply failures are. I would have guessed that since they are one of the simplest components in a computer, they’d be among the most reliable. Perhaps the high failure rate is due to the sheer amount of power they handle.
— Christopher D. Long (@octonion) January 20, 2021
Now since a PSU can be a costly component, I always follow some basic tests and methods to test it out before opting to replace it. Which is the reason why I would also suggest users facing similar issues and experiencing sudden power outages to check their power supplies using these basic and simple methods I explained in my article.
FAQs
The Power Supply Unit or PSU of a system can crash or fail occasionally.
The causes of a power supply failure may be a sudden voltage spike, sudden irregularity in the input electrical energy, or sudden power outage, which causes the system to shut down abruptly.
We can test the power supply for errors and faults using basic tests such as the jumper wire, PSU, and multimeter tests.
Relevant Articles:
Thank you! Please share your positive feedback. 🔋
How could we improve this post? Please Help us. 😔
[How-To Guides Expert]
Laiba, our tech guru at Tech4Gamers, simplifies and crafts How-To Guides with a Google IT Support Certificate. Beyond tech, she captures the city’s aesthetics through her lens. Join her journey where tech meets creativity!
Get In Touch: Laiba@tech4gamers.com


