 Threads

The Battlefield 6 Open Beta is in full swing, and players are loving it. The game’s already smashed records with an all-time high player count. The big draw? Battlefield has finally returned to its combat-focused, no-nonsense roots, something many felt was missing in the last installment. On top of that, the Open Beta is free, surprisingly polished for a test build, and only a 35–39 GB download (depending on platform), so you can be in-game fast.
As far as performance goes, the system requirements aren’t too demanding, but there’s one extra catch: EA now requires Secure Boot to run Battlefield 6. If you’re seeing the error “SecureBoot is not enabled. Learn how to use SecureBoot at [go.ea.com/SecureBoot] (111)” when launching the game, you’ll need to hop into your system’s BIOS and adjust a few settings.
Prerequisites For Enabling Secure Boot
Before flipping the Secure Boot switch in your BIOS, there are a couple of things to confirm. These checks make sure your system meets the requirements so you don’t end up staring at the same error again. The main things to verify are:
- TPM 2.0 is turned on
- Your Windows drive uses GPT, not MBR
- Your BIOS is set to UEFI mode
1. Make Sure BIOS Is Set To UEFI
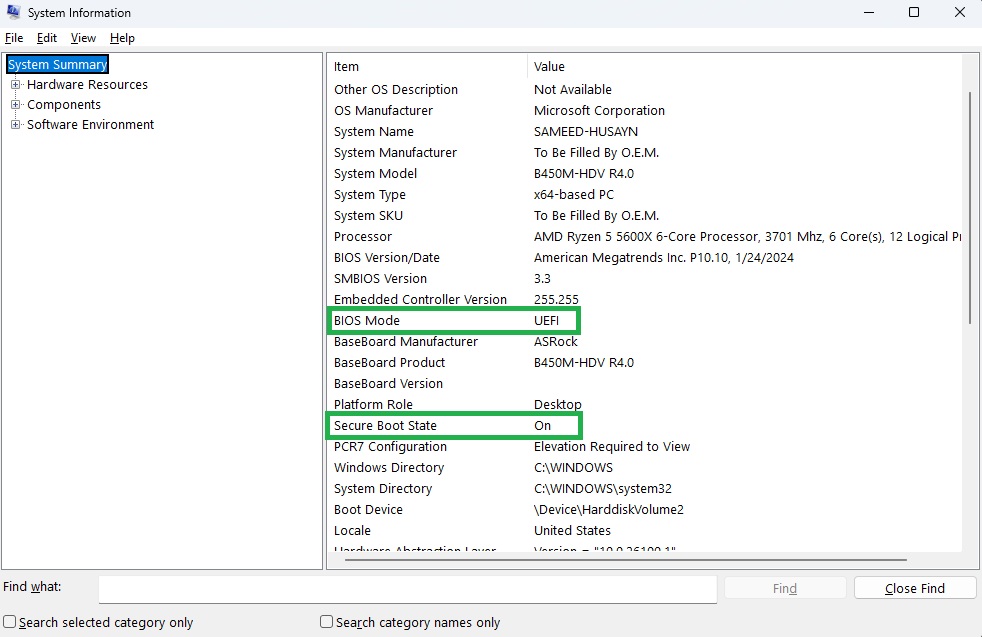
If your system is still running in Legacy or CSM mode, Secure Boot won’t even show up. You can check your boot mode in Windows by:
- Press Windows + R, type msinfo32, and hit Enter.
- In the System Information window, look for “BIOS Mode.”
- If it says UEFI, you’re good.
- If it says Legacy, you’ll need to switch your BIOS to UEFI after converting your drive to GPT. The exact steps depend on your motherboard/PC brand.
- Similarly, if your Secure Boot is set to Off, this means you have to follow along, as you don’t have Secure Boot on.
- In case Secure Boot is set to Unsupported, it can be due to several reasons: TPM 2 disabled, BIOS not UEFI, or motherboard unsupported.
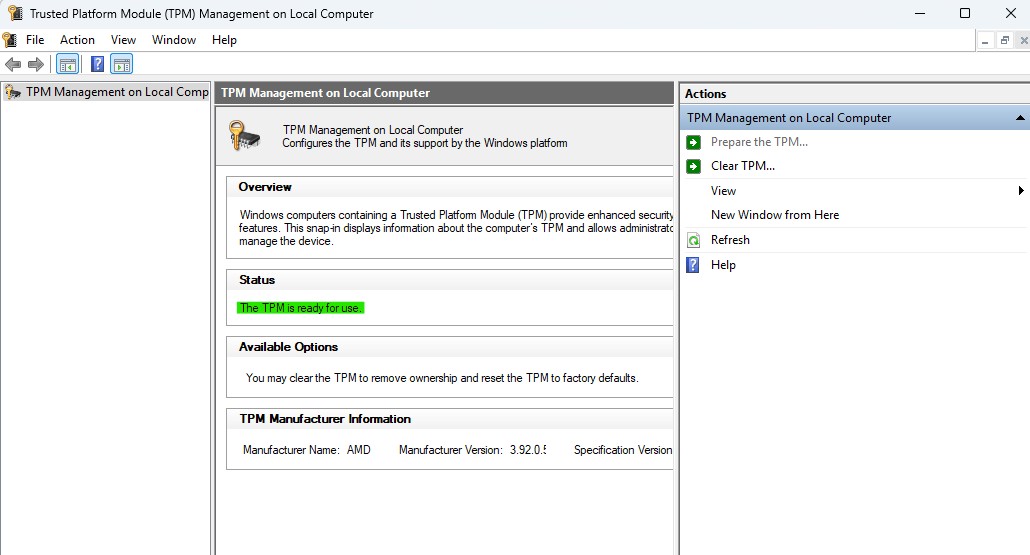
2. Check If TPM 2.0 Is Enabled
- Press Windows + R to open the Run window.
- Type tpm.msc and hit Enter.
- A new window will pop up showing your TPM status. If it says “The TPM is ready for use”, you’re good here.
- If it says otherwise, you’ll need to enable TPM in your BIOS.
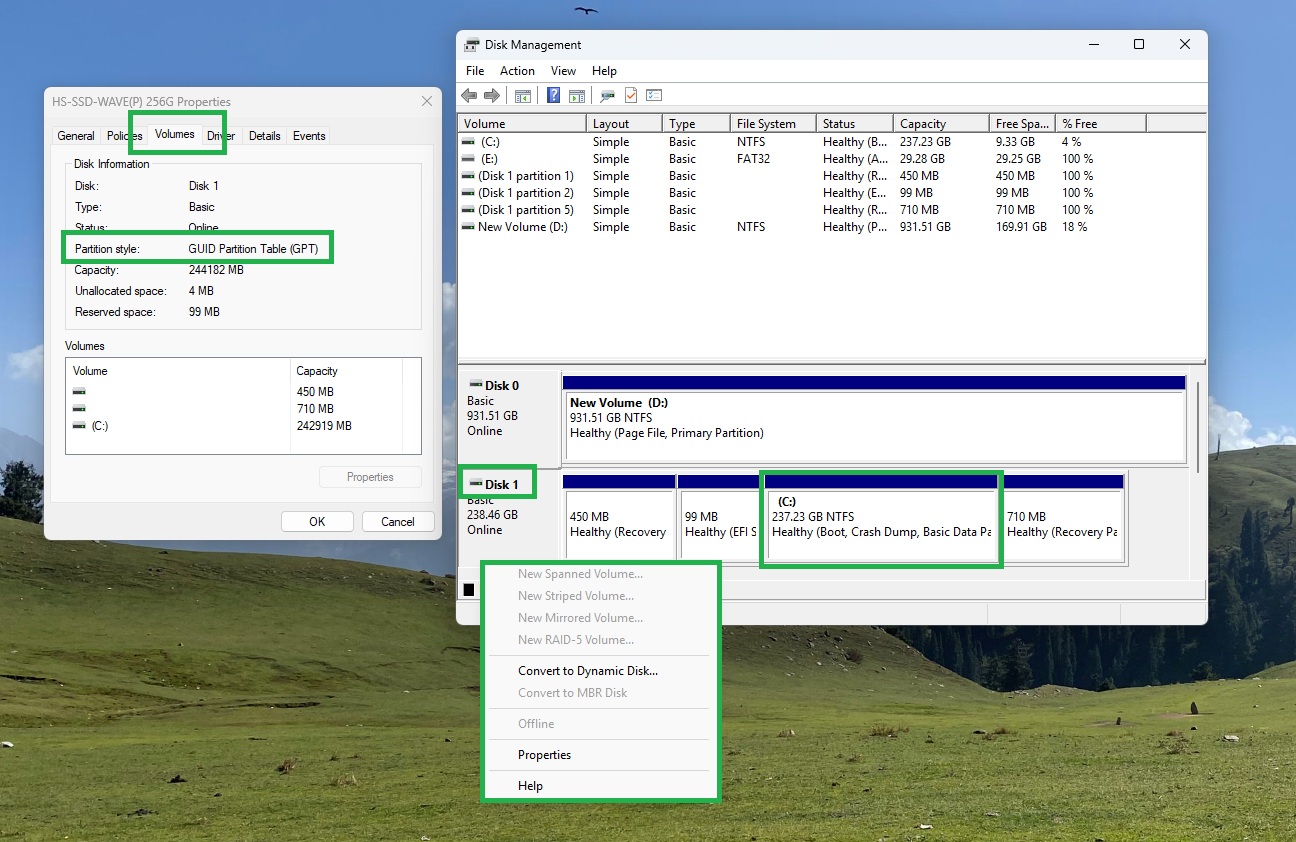
3. Check Your Disk Format (GPT or MBR)
- Press Windows + X and choose Disk Management.
- Find the drive that has your Windows installed (usually called OSDisk (C:)). Right-click the leftmost box for that drive (the one showing Disk 0 or Disk 1) and choose Properties.
- Go to the Volumes tab and look for “Partition Style.”
- If it says GUID Partition Table (GPT), you’re done.
- If it says MBR, you’ll need to convert it to GPT before proceeding.
In case you need to convert your disk format to GPT, follow these steps:
- Press Windows + R, type powershell, and press Ctrl + Shift + Enter to run it as an administrator.
- In the window that opens, type: mbr2gpt /validate /disk:0 /allowfullOS (Replace disk:0 with the number you saw in the Properties window earlier.)
- If the validation passes, type: mbr2gpt /convert /disk:0 /allowfullOS (Again, replace disk:0 with your actual disk number.)
Once you’ve got TPM 2.0 enabled, your drive set to GPT, and your BIOS is set to UEFI, you’re all set to enable Secure Boot without hitting any roadblocks.
How To Enable Secure Boot
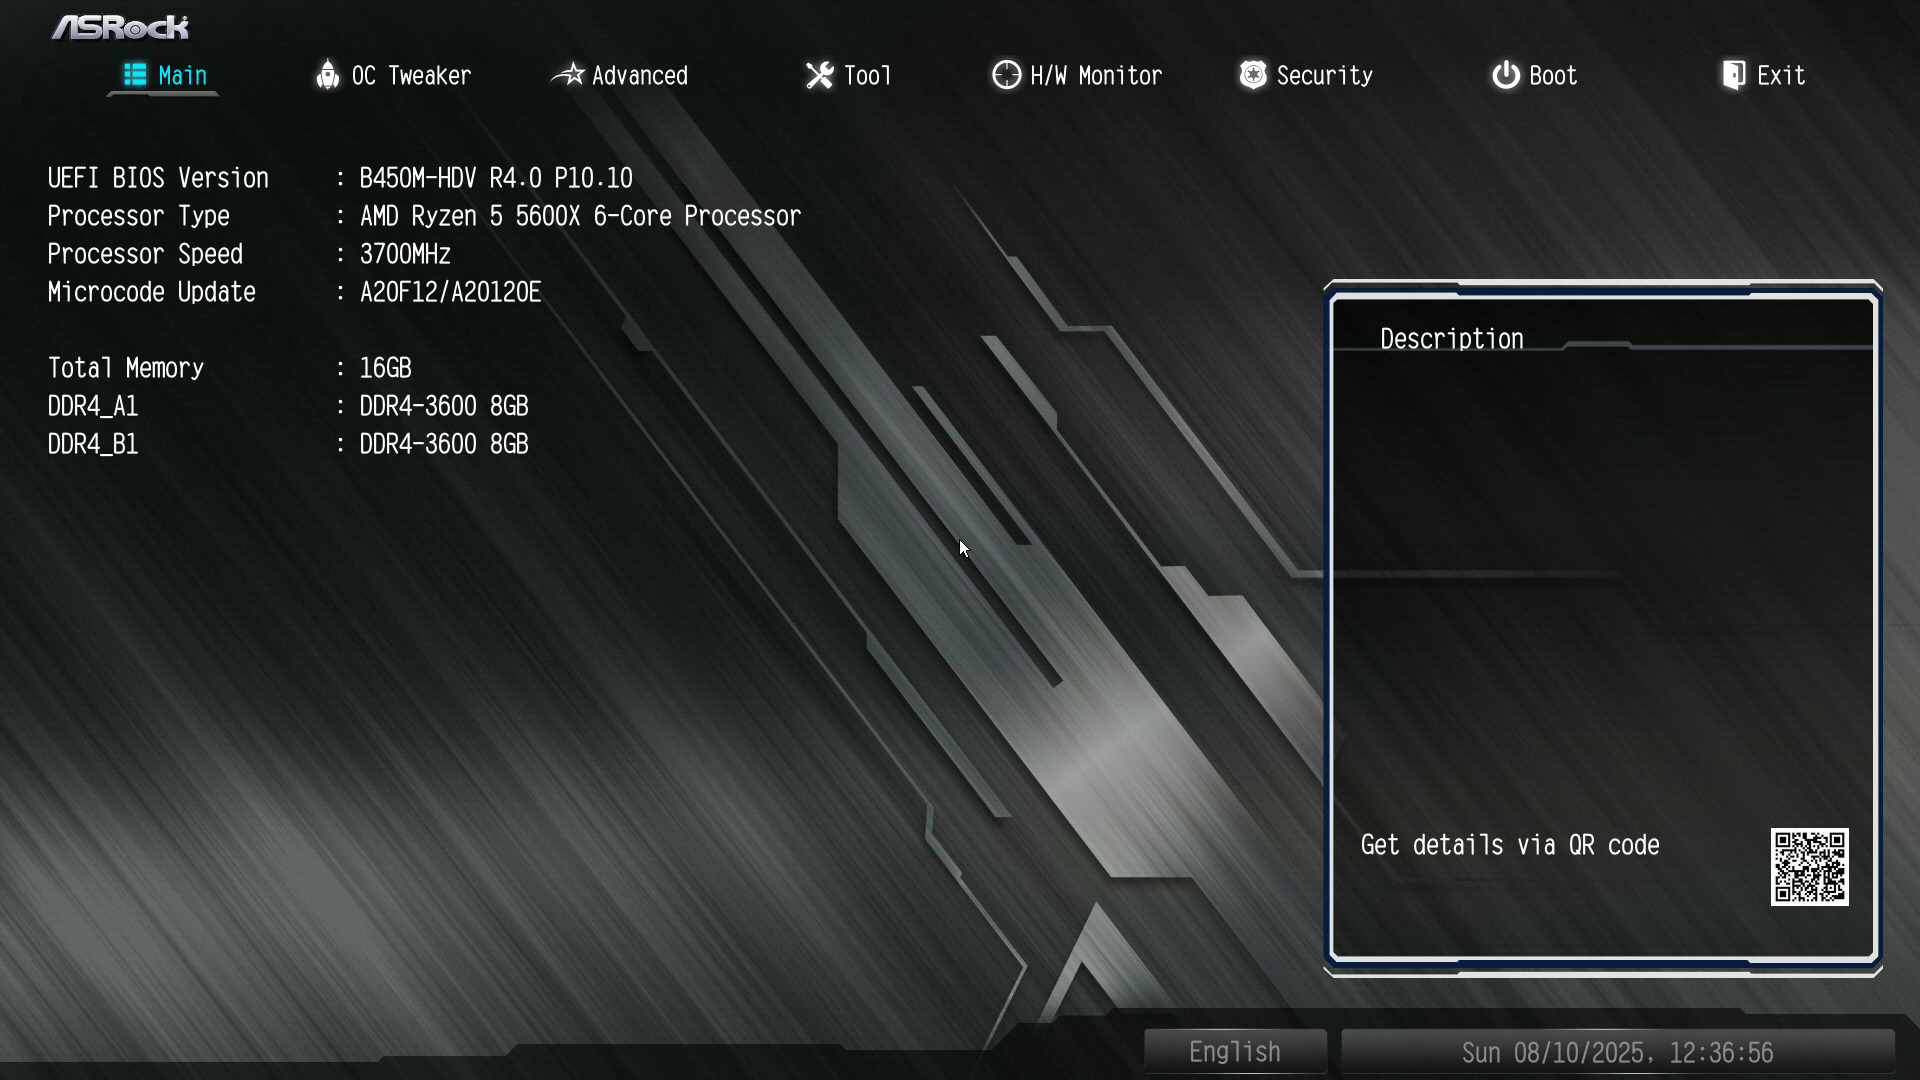
The exact steps can slightly vary based on your motherboard, but they are more or less the same. The screenshots are from an ASRock motherboard.
- Restart your PC. As it boots, repeatedly press the key your system uses to open the BIOS setup, usually F2, F10, DEL, or ESC. Your motherboard or laptop brand might use a different key, so check your manual or look for the on-screen prompt during startup.

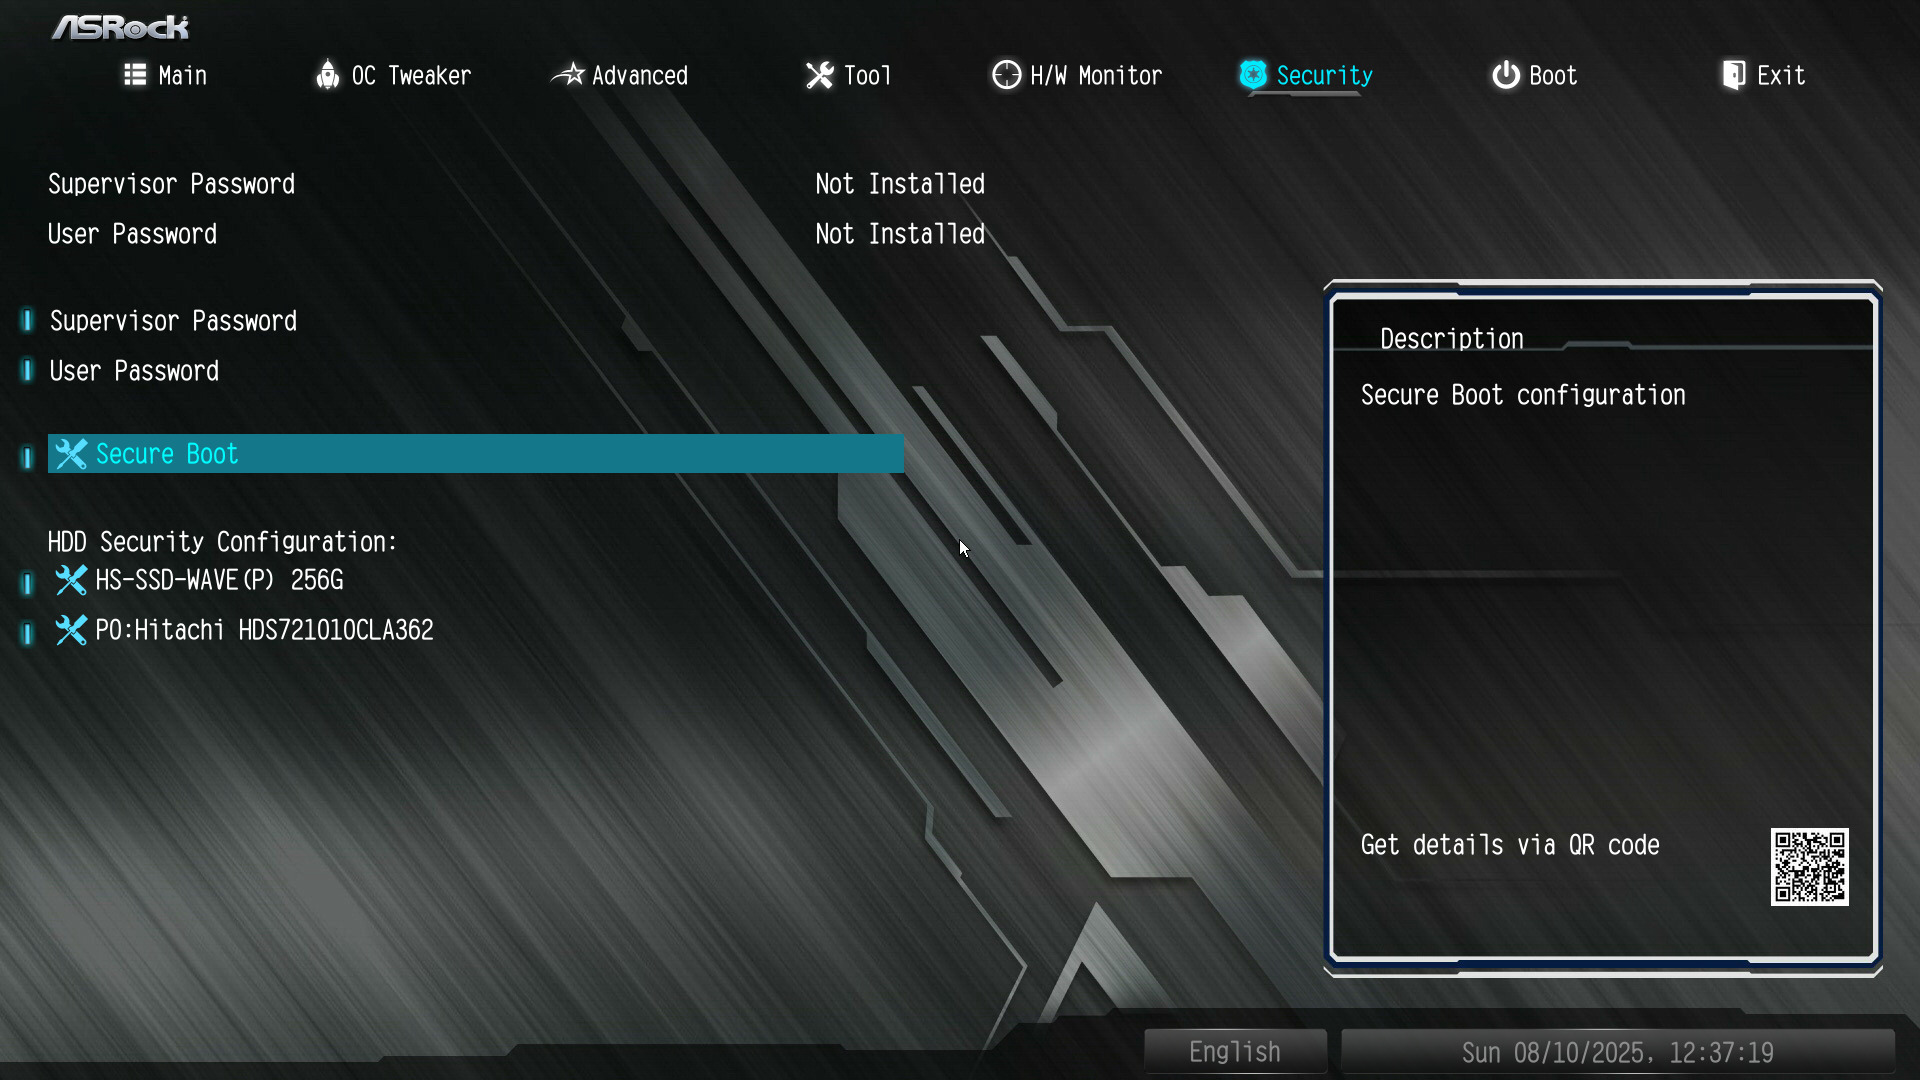
- In the BIOS, look for a tab called Boot, Security, or sometimes Authentication.
- Look for the Secure Boot option, and hit Enter.
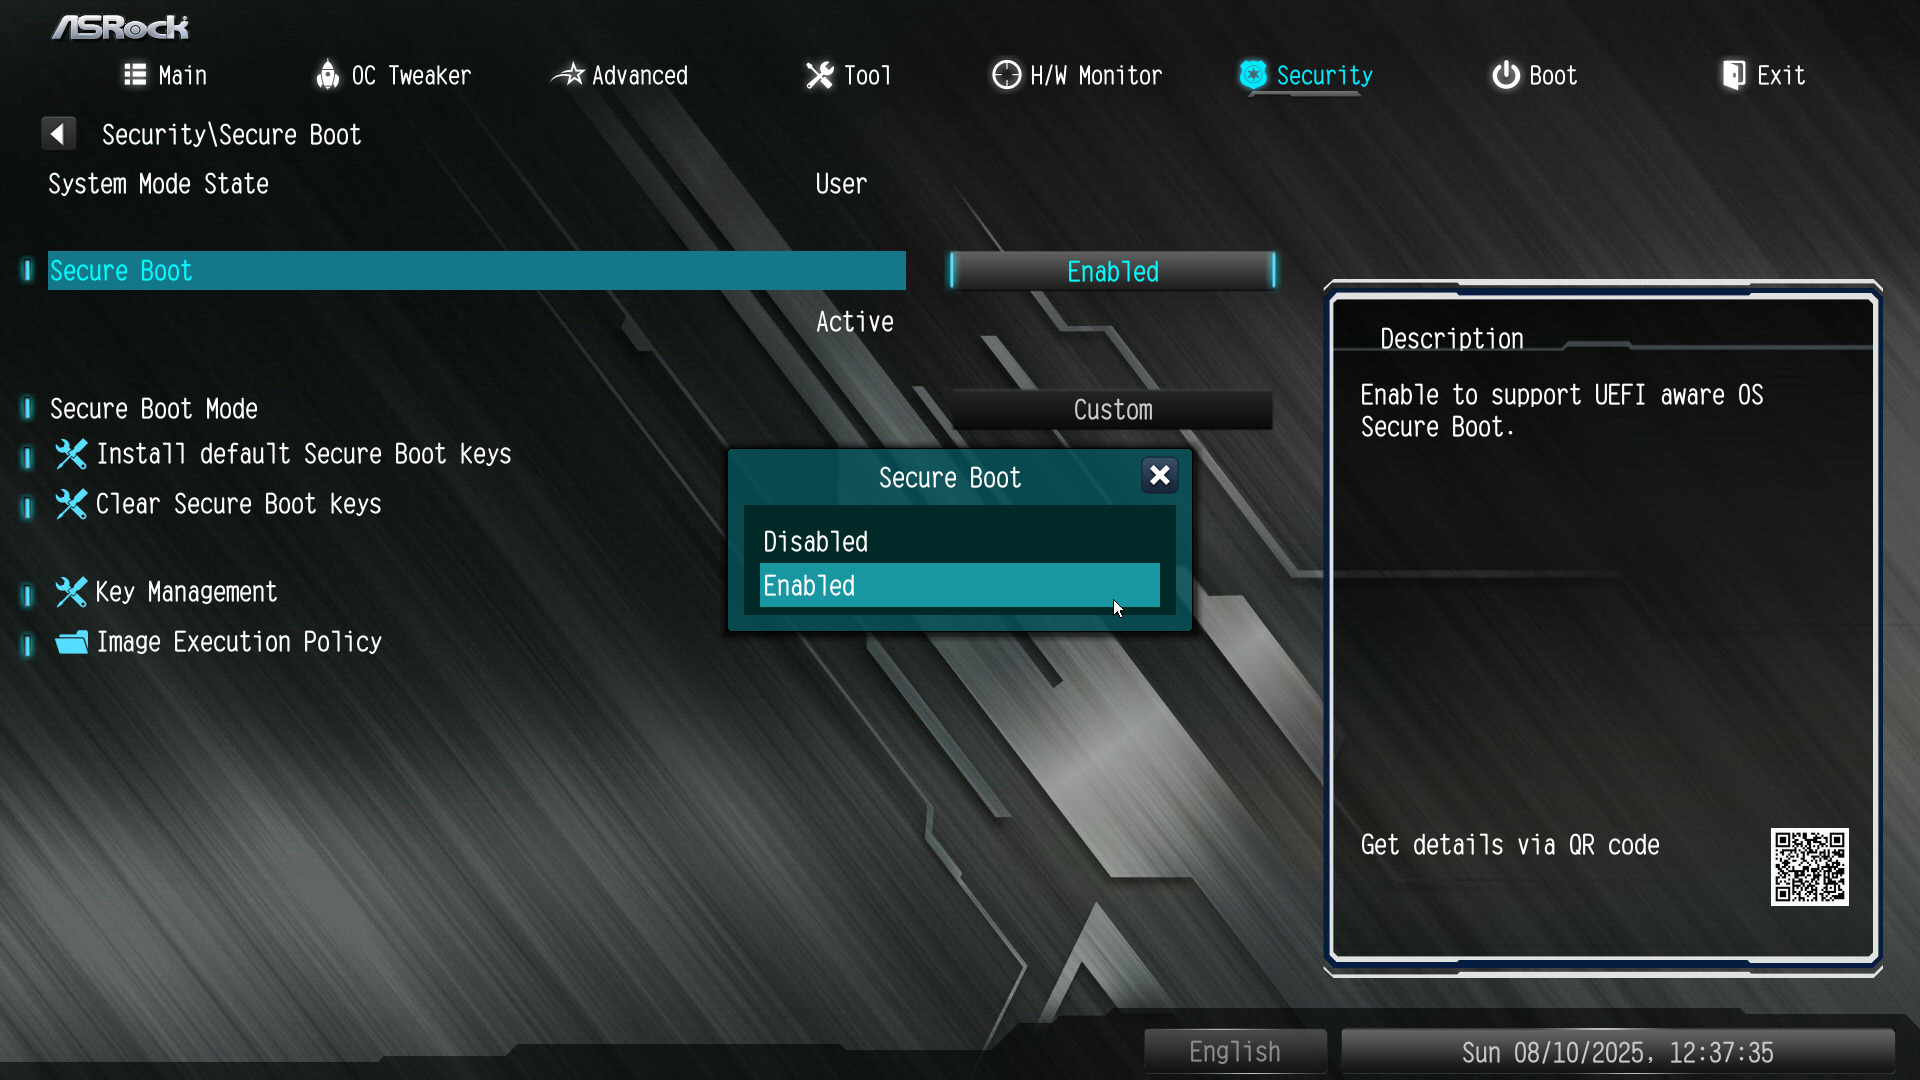
- In the Secure Boot tab, change the Secure Boot setting to Enabled. If there is Active written below it, you are good to go. If not, follow along.
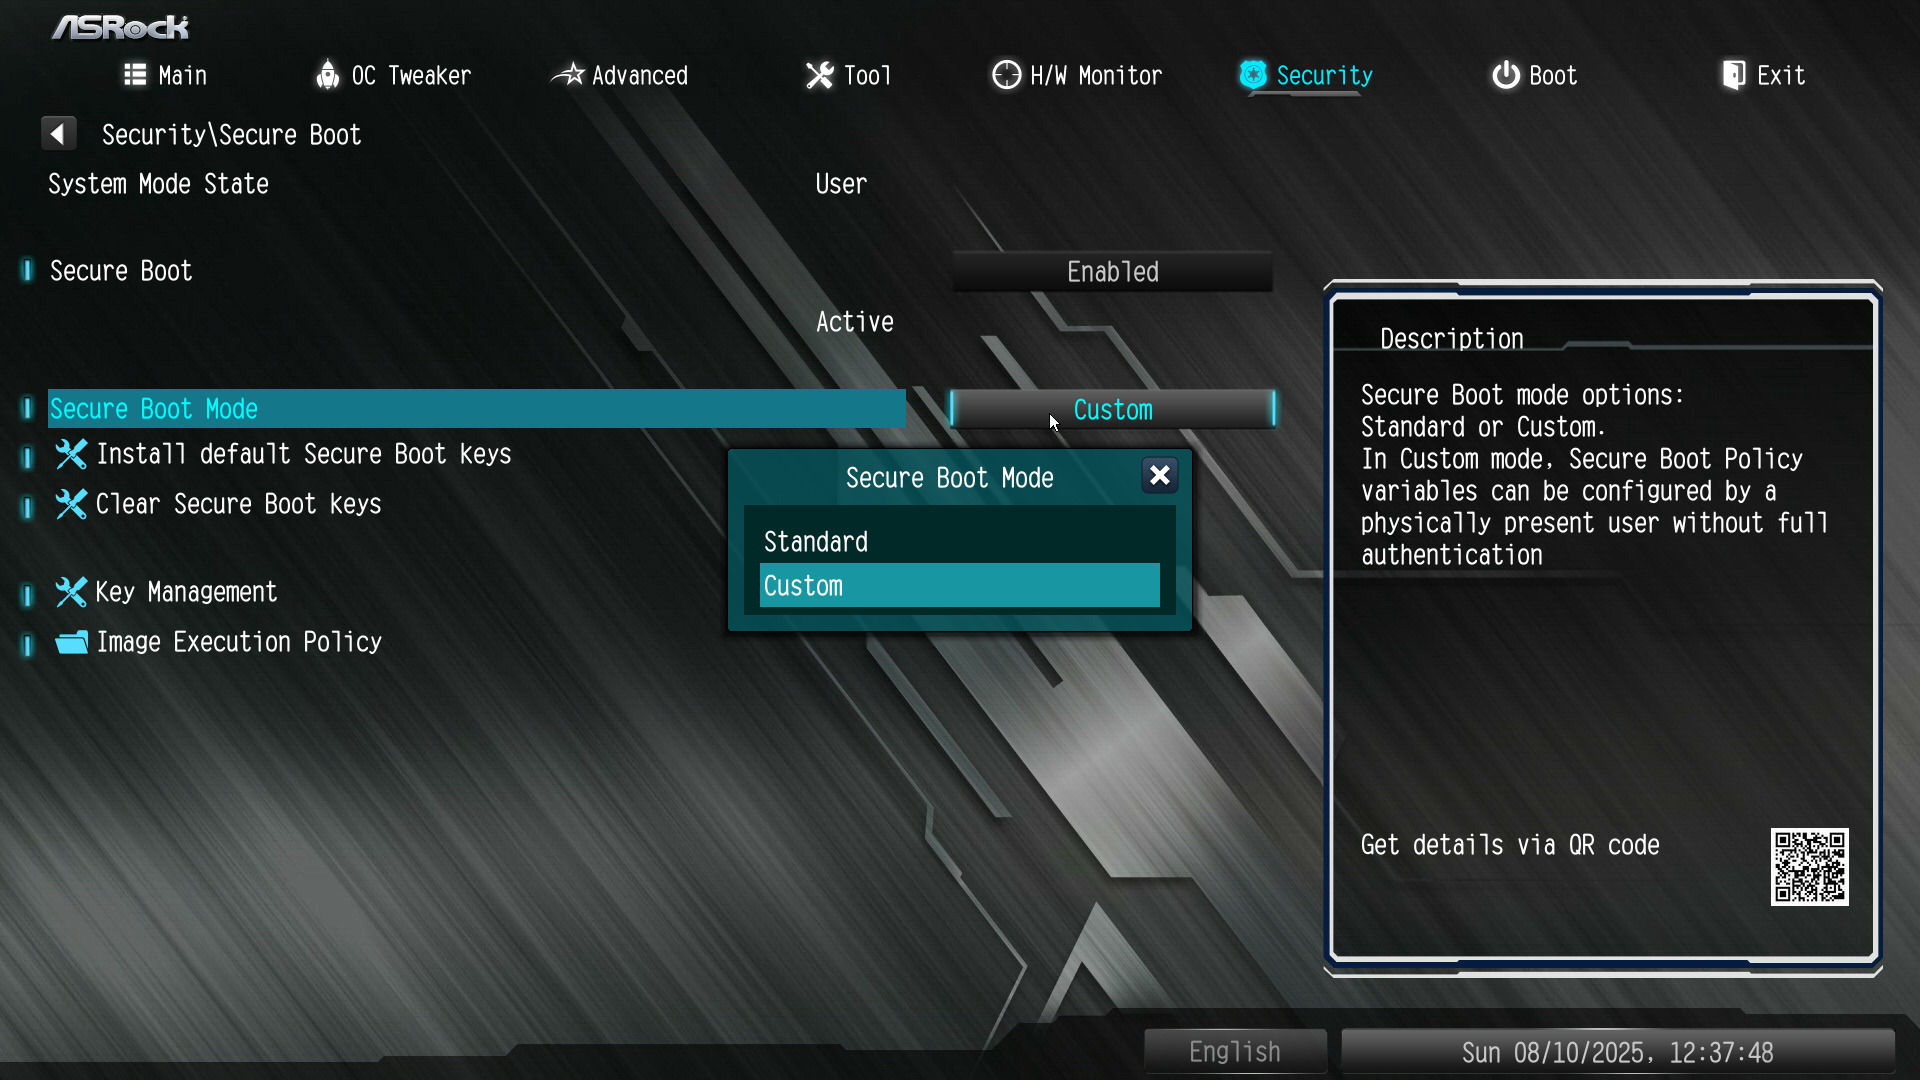
- Change the Secure Boot Mode setting to Custom.
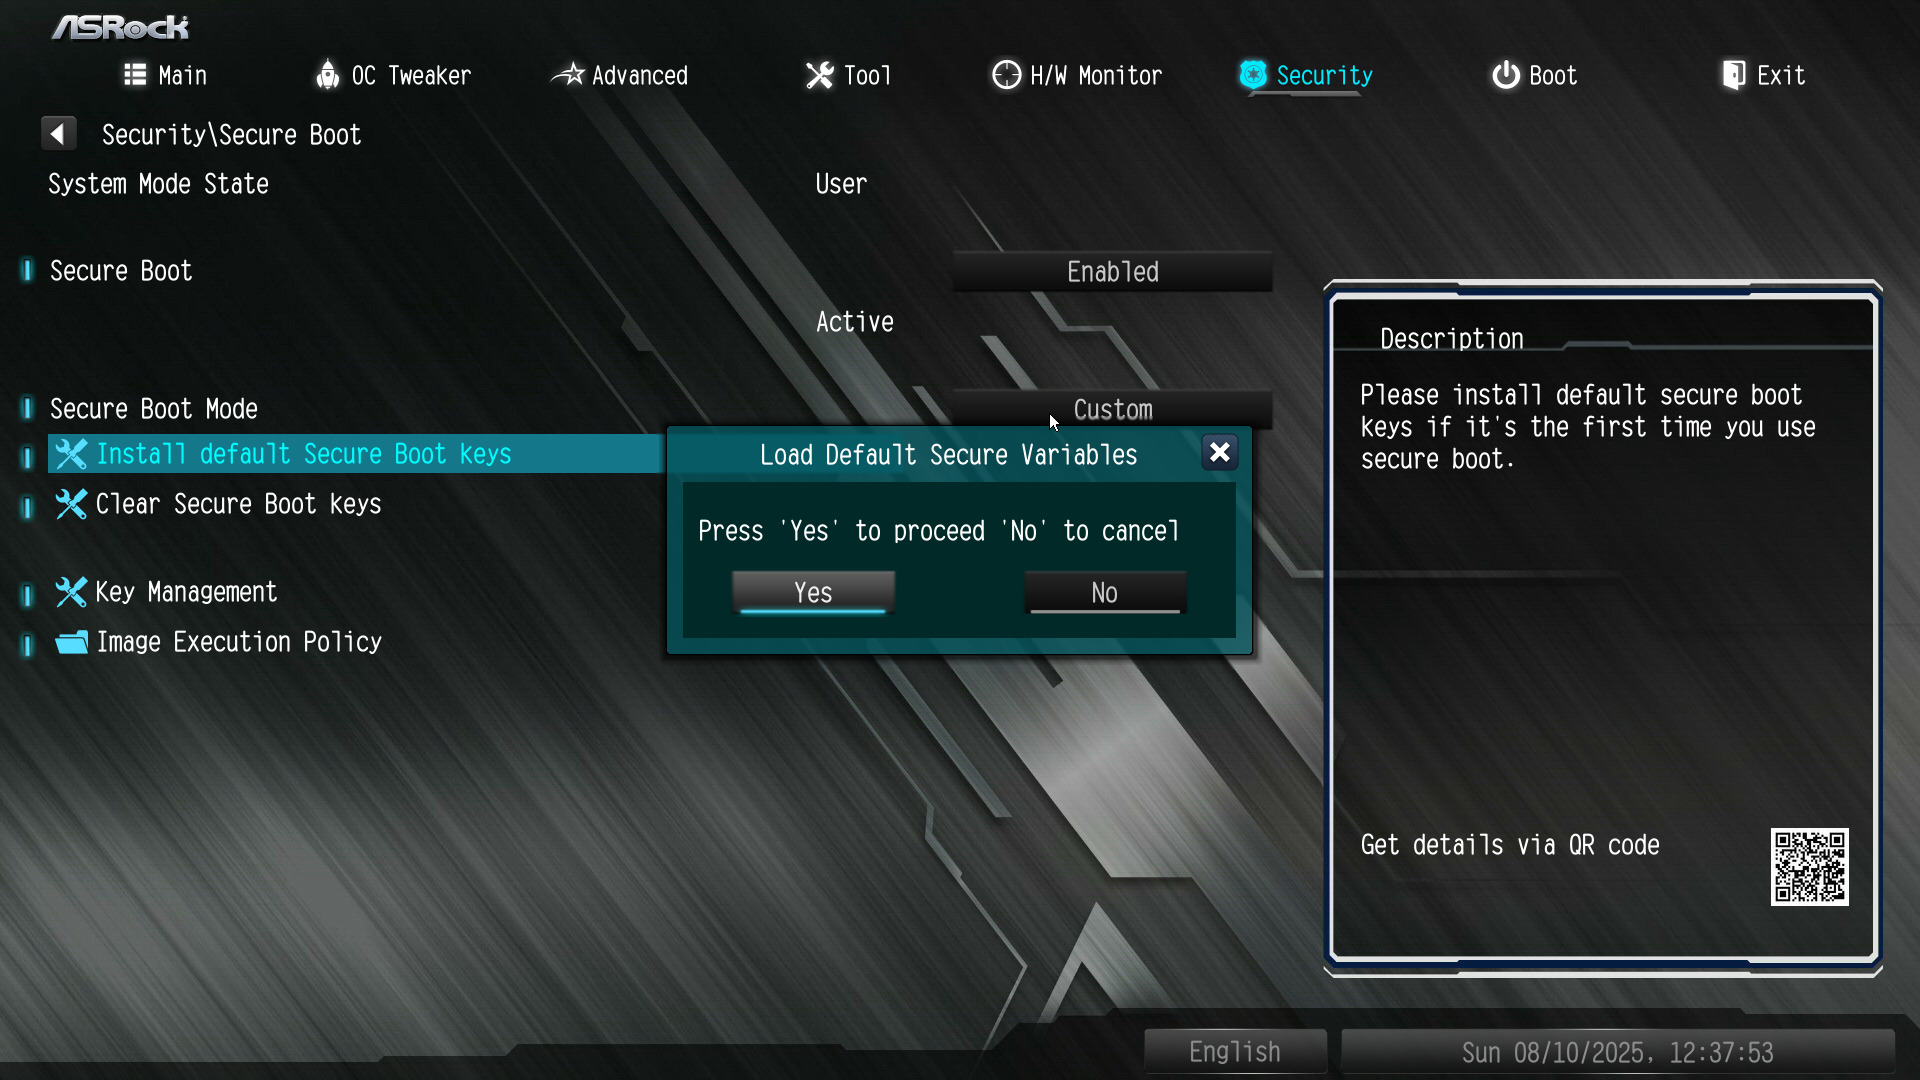
- Install the default Secure Boot keys (you will reboot into the BIOS).
- Try enabling Secure Boot again, and it should work this time.
- Save and exit.
What Is Secure Boot And Why Battlefield Needs It?
Secure Boot is a PC security feature that makes sure your system only starts up with trusted software. Think of it like a bouncer at the club door: it checks the ID (digital signature) of your boot files and drivers before Windows even begins to load. If something is fake or tampered with, it’s denied entry.
In Battlefield 6, Secure Boot works together with EA’s Javelin Anti-Cheat to spot and shut down cheats before they can get near the game. By running at a deeper system level, it makes it far harder for malicious programs to slip in during startup, resulting in fewer cheaters and a smoother experience for legitimate players.
Frequently Asked Questions
On some boards, Secure Boot might appear enabled but isn’t active. You may need to set it to “Custom” and restore the factory keys before it counts as active.
Not really. Secure Boot only kicks in when your PC starts up, not while you’re playing. EA and other publishers say enabling it doesn’t affect game performance.
Thank you! Please share your positive feedback. 🔋
How could we improve this post? Please Help us. 😔
[Hardware Expert]
With a major in Computer Science, Sameed is a tech enthusiast who puts his passion for gadgets into words and creates informative blogs. From comparing different hardware to reviewing the best RAMs, motherboards, and graphics cards for your next build, Sameed has covered a wide spectrum of topics that have given him a special insight into every nook and cranny of the tech world. Sameed is also a certified expert at Computer Hardware & Networking.
Get In Touch: sameed@tech4gamers.com


